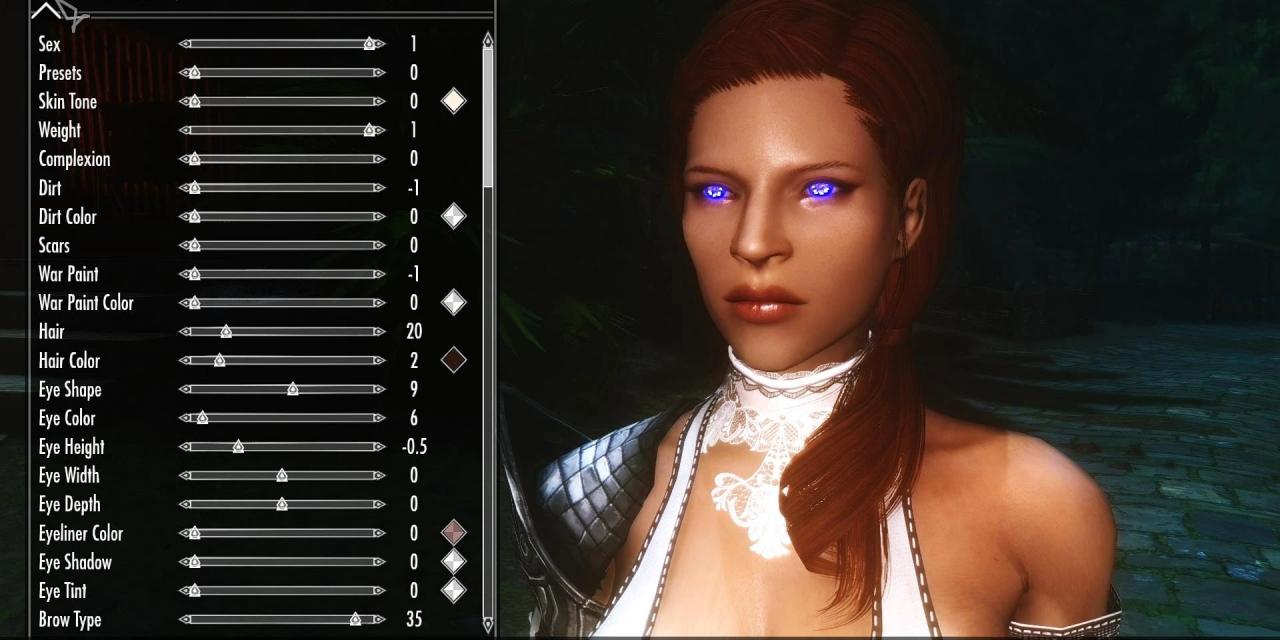
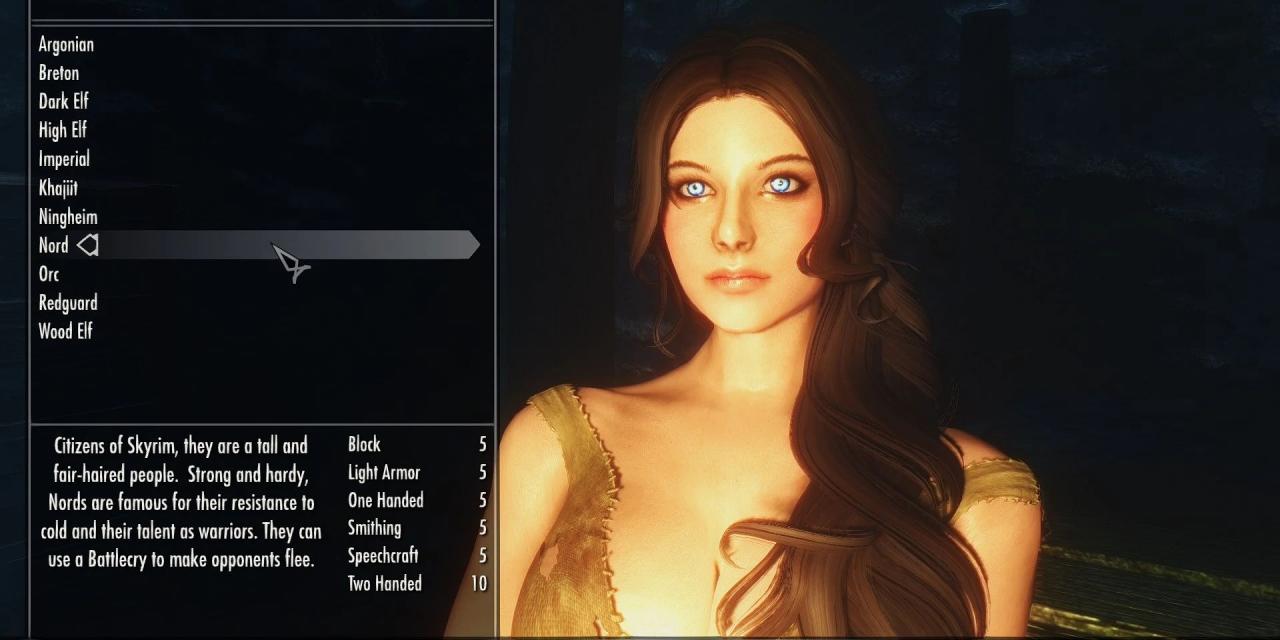
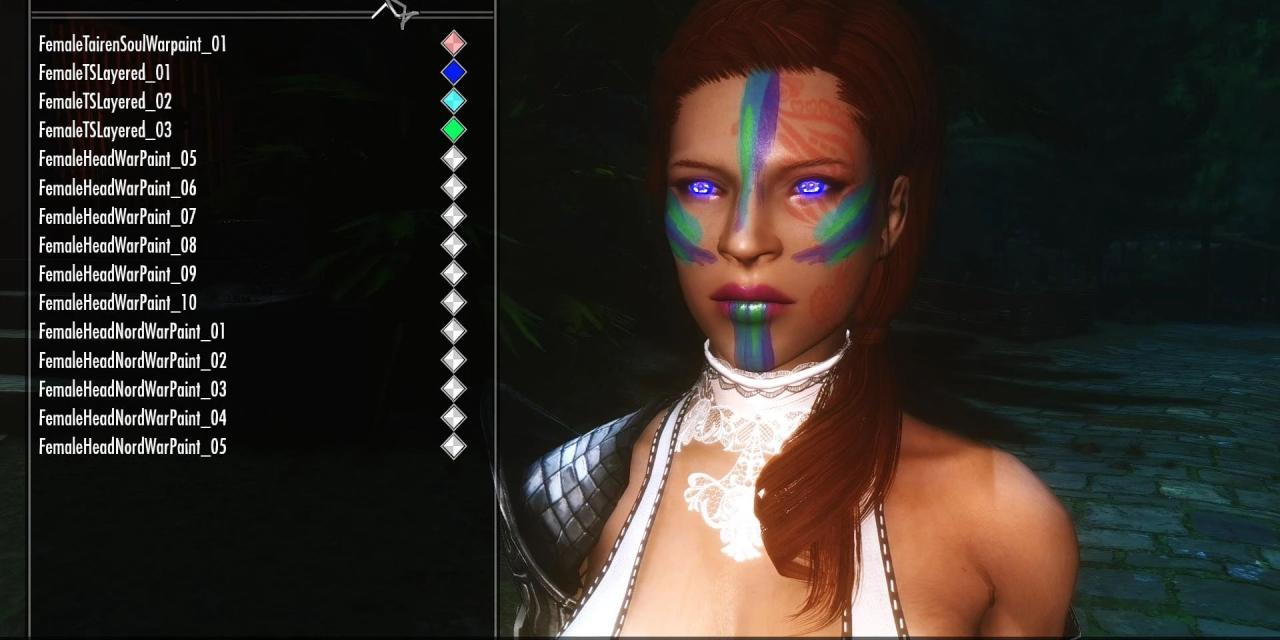
Complete overhaul to the character creation menu including new customization features such as multiple RGBA warpaints, body paints, hand paint, and foot paints. (Requires SKSE)
REQUIREMENTS:
The Skyrim Script Extender (SKSE), Version 1.7.2 (or newer) is REQUIRED to run the RaceMenu.
PURPOSE:
The RaceMenu was redesigned with the intention of using SKSE to allow for more in-depth customization of your character. This mod does not fix the problems with the internal class to this menu; it merely redesigns it and adds more features. Please ensure that you don't have problems opening the ORIGINAL RaceMenu before blaming this mod.
FEATURES
RaceMenu.esp
- Numeric display for all sliders
- Categorizes all the vanilla options to the SkyUI look
- Search filter by name (Same as SkyUI)
- Color ANY tint, including hair with an AARRGGBB value
- Loads/Saves settings when re-opening the menu
- Light On/Off (Spawns a white light directly infront of your character)
- Zoom distances adjusted to be closer to the face when In and slightly further when out
- Basic plugin interface
- Controller support
- Works with any race, including custom races
- Doesn't modify any vanilla assets (Unlike my Extended Slider Colors mod)
- Multi-warpaint support
- Warpaint texture hotswapping (Custom warpaint)
- Display racial skill bonuses
- Save/Load presets to and from windows clipboard
- Supports body/hand/feet/face overlays
- Save/Load color
- Change overlay glow color
- Change overlay glow strength
- Export head mesh (Requires CharGen)
- Save/Load preset to and from a slot file (Requires CharGen v2.0.0 or greater and replaces clipboard save/load)
- Show HeadPart name and source mod (Requires CharGen v2.1.2 or greater)
- Camera move up/down/left/right zoom in/out
RaceMenuPlugin.esp (Optional)
- Adjust player height
- Adjust player bicep size
- Adjust player glute size (Only works for meshes that support skeletal scaling e.g. TBBP body meshes)
- Adjust player breast size (Only works for meshes that support skeletal scaling e.g. BBP body meshes)
- Adjust player breast curve size (Only works for meshes that support skeletal scaling e.g. TBBP body meshes)
RaceMenuMimic.esp (Optional) Not recommended for cross-gender, cross-species, or horse-mounted use.
- Copies target Actor's facial morphs to player
- Copies target Actor's facial presets to player
- Copies target Actor's hair to player
- Copies target Actor's hair color to player
- Copies target Actor's facial hair to player
- Copies target Actor's scars to player
- Copies target Actor's eyebrows to player
- Must be equipped via console (e.g. help "Face Copy" player.equipspell XXXXXXXX left)
RaceMenuOverlays.esp (Optional)
- Adds 8 male body tattoos (Made by krisjay)
- Adds 14 partial female body tattoos (Made by TairenSoul)
- Adds 1 female UNP nail paint (Made by me, but it's pretty awful)
BodyGen randomize
There is now new syntax to the previous feature to allow randomization of all actors of a particular gender.
To setup an initial BodyGen file you need to create two ini files at:
meshes/actors/character/BodyGenData/%MOD_FILENAME_WITH_EXT%/
morphs.ini
templates.ini
The templates file outlines BodyMorphs by name
Here is a sample:
Sevenbase=7B High@1.0 | 7B Bombshell High@1.0 | 7B Natural High@1.0 | 7B Cleavage High@1.0 | 7B Bcup High@1.0
Breasts=BreastSH@1.0 | BreastSSH@2.0, Breast@1.0, BreastCleavage@0.1:1.0, BreastGravity@0.1:1.0
The morphs file defines what morphs should be available to what ActorBases, here is an example:
Skyrim.esm|F62F0=Sevenbase,Breasts
For the new All feature, this would say:
All|Female=Sevenbase,Breasts
Make sure you have empty new lines at the end of your ini files.
If you have explicit overrides in other mods they will overwrite by load order, so if you have all in an earlier mod, then have one explicit in a later mod, the ActorBase will use the later setting.
Equippable Transforms
What are Equippable Transforms? They are essentially additional data that can be attached onto Armor that will apply an NiTransform internally to the skeleton. What would you use this for? Replacing High Heels of course! The transform is also done natively so it's near instant application.
How do you use it? Simple, add an NiStringExtraData named "SDTA" without quotes (Skeleton Data) to your NiTriShape or NiTriStrips of the armor you want to apply it to (You may need to apply to both _0 and _1)
The "String Data" will be a JSON formatted string, here is a sample:
[
{"name":"NPC L Breast","scale":2.0,"pos":[0,0,0],"rot":[0,0,0]},
{"name":"NPC R Breast","scale":2.0,"pos":[0,0,0],"rot":[0,0,0]}
]
The "name" field is the name of the node you are transforming
The "pos" field is a relative translation of the node you are transforming
The "rot" field is a rotation in degress in euler angles (heading, attitude, bank)
Here is a sample for replacing High Heels
[{"name":"NPC","pos":[0, 0, 5.0]}]
You may need to tweak the units as I just eyeballed it for the particular boots I was using.
This runs off the existing Transform framework that NiOverride provides, so any modifications to particular nodes will stack with these, you can only have one internal equipped node transform (i.e. two pieces of armor cant modify the same node, overwriting will happen and the behavior will most likely be last written or undefined).
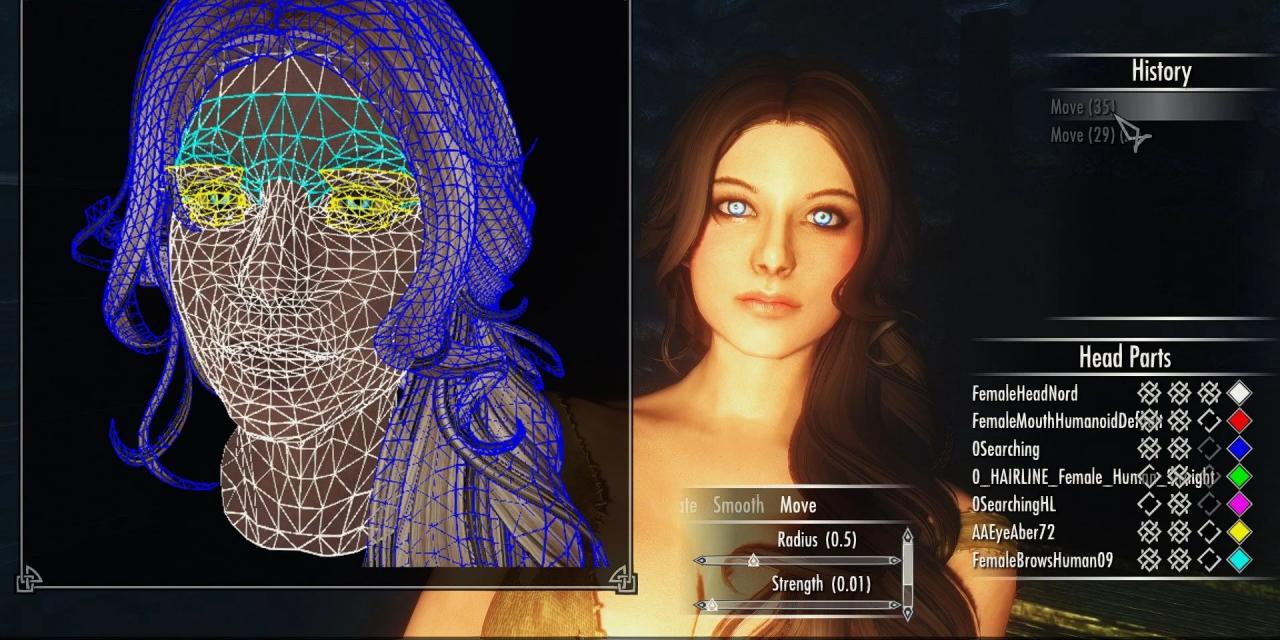
Sculpt Mode
Head Import
This feature will import the geometry of a nif file that is formatted for NPCs (You either exported it, or you copied an NPC's into the directory)
Sculpt
This feature is complicated, the tools you have available are Inflate, Deflate, Smooth, Move, and Mask.
Rotating
Drag with right mouse click
Panning
Hold the Secondary button and drag with right mouse click to pan.
Inflate/Deflate
Moves the hit vertices out/in based on an average of adjacent face normals
Smooth
Moves the hit vertices to an average position of all adjacent vertices, CAUTION do not use near openings such as the mouth
Move
Moves vertices in the direction you move the cursor, orthogonal to the view plane
Mask
Excludes vertices from being altered, including imported geometry, if you are importing a head with a different neck seam you should mask add around the neck area before importing
History
History will store all previous vertex actions including Clear Sculpt, Import Geometry, and all brush actions
Head Parts
This is the window for changing the wireframe preview including locking the mesh (so it can't be edited) making the mesh visible, or changing the wireframe color
Clear Sculpt
This will wipe all sculpting data from all ACTIVE parts (Editable must be checked)
File based Presets
Presets are now saved to explicit file names and have changed format to json, as such will be saved as .jslot files, if you are replacing an existing slot file, refrain from replacing a .slot file, clicking on a selected file when saving will overwrite the selected file, and the file extension will be for binary but will try to load the json and fail. Binary slot files can still be loaded for legacy purposes, however this format is no longer saved by CharGen.
There will not be, nor will ever be controller support for the Sculpt feature, sorry.
High-Resolution Warpaint
An INI setting has been added to SKSE to allow for higher resolution warpaint to be applied to your character. The default resolution is 256, this is a terrible resolution if you want to do some really fancy warpaints.
- Locate your Data directory
- Create SKSE folder if it is not already there
- Create SKSE.ini if it is not already there
- Add "[Display]" category
- Add "iTintTextureResolution=2048"
Your Data/SKSE/SKSE.ini should look something like this:
[Display]
iTintTextureResolution=2048
Putting a higher resolution should be possible but I have only tested it at 2048.
Note: This may cause low resolution textures to look worse due to upscaling, hopefully this will encourage high-resolution replacements.
Keymapping
Keyboard:
- Choose Color/Accept - Activate (Default E)
- Done - Ready Weapon (Default R)
- Light - Sneak (Default Ctrl)
- Zoom - Sprint (Default Shift)
- Search - Jump (Default Spacebar)
- Choose Texture - Wait (Default T)
- Load Preset - Quickload
- Save Preset - Quicksave
- Export Head - Shout (Default Z)
Controller:
- Choose Color/Accept - Activate (Default A)
- Done - Ready Weapon (Default X)
- Light - Wait (Default Back)
- Zoom - Sprint (Default RB)
- Search - None
- Choose Texture - Jump (Default Y)
- Load Preset - Left Stick
- Save Preset - Right Stick
- Export Head - Shout (Default LB)
- Change Sub Category - Left/Right Trigger
FAQ
Q. How do I change the number of overlays available?
A. Open Data/SKSE/Plugins/NiOverride.ini in any text editor and change the values here.
Q. Do I need to install CharGen Extension?
A. Not for versions 2.7 and up, CharGen Extension is completely included, you should uninstall it if you had it prior to installing 2.7 and up.
Q. I see dollar signs everywhere and many features appear to be missing what do I do?
A. Install SKSE, or if you have installed it, run your game using skse_loader.exe as you should be.
Q. Is this compatible with ECE?
A. Partially, only a few features will work, generally I do not recommend using them together as presets will not work.
Q. How do I get more Face/Body/Hand/Feet Paint?
A. Open Data/SKSE/Plugins/NiOverride.ini in a text editor, you will see a section for the amount of paints you can have per type, you can change this up to 128, but it is highly recommended you only set what you intend to use as too many can result in significant performance losses.
Making a plugin
This short tutorial assumes you have SKSE 1.6.6 (or greater) correctly installed, already have basic knowledge in compiling scripts, using the Creation Kit, can solve compiling errors on your own, and assumes you have already downloaded the modders package.
- Extract the modders package to your Data folder
- Open Creation Kit (You do not need to load Skyrim.esm)
- Create new quest
- Give quest a unique ID
- Press Quest Aliases tab
- Right click the list, New Reference Alias
- Name the alias Player
- Tick Specific Reference
- Press Select Force Reference
- Select Cell (any), Ref PlayerRef ('Player') click OK
- Press the Add button in the Scripts group
- Type RaceMenuLoad into the filter and click OK
- Press OK in the Reference Alias window
- Go to the scripts tab and Add
- Click [New Script], give the script a name
- Open the script in your editor of choice and change extends Quest to extends RaceMenuBase
- Copy contents of PluginTemplate.psc to your new script
- Read the comments inside of the template
- Click OK in the Quest window
- Save your plugin
- Add your warpaints/sliders to your script
- Compile your script
To package and distribute your plugin you only need to include:
Data/Scripts/YourPlugin.pex
Data/YourPlugin.esp
COMPATIBILITY
Enhanced Character Edit is not directly compatible. RaceMenu has compatibility code to accommodate some of the extra facial morphs, install ECE first, then install RaceMenu to take advantage of this. There will be a CharGen verison of ECE sliders soon.
Extended Slider Colors (My previous mod) is not incompatible, but it is highly recommended you uninstall it as it is no longer necessary.
LOAD ORDER
Irrelevant, put it anywhere you want it won't make a difference.
INSTALLATION
Automatic Download with NMM
- Click the Download with manager button on top of the file.
- RaceMenu will appear in in NMM's Mods list once it's downloaded. Double-click the RaceMenu entry to Activate it.
OR
Manual Download with NMM
- Start NMM and click on Mods.
- In the left icon bar, click on Add Mod From File and select the downloaded archive file.
- RaceMenu will now appear in the list. Double-click to Activate it.
OR
Manual Installation
- Locate the Data/ folder in your Skyrim installation directory. Typically it's found at Program Files/Steam/steamapps/common/skyrim/Data/.
- Extract the contents of the downloaded archive file to your Data/ folder.
- In the Skyrim Launcher, select Data Files and enable RaceMenu.esp.
File information
File name: Skyrim_RaceMenu_v3.4.5.7z
File size: 13.33 MB
Mime type: application/x-7z-compressed; charset=binary
File name: Skyrim_MimicPlugin_v2.0.0.7z
File size: 2.28 KB
Mime type: application/x-7z-compressed; charset=binary
File name: Skyrim_OverlaysPlugin_v2.5.0.7z
File size: 7.3 MB
Mime type: application/x-7z-compressed; charset=binary


